cosmo: 3D Graphics Engine in Terminal
2024-08-07 04:26:15 tech Computer Graphics Ray Tracing Rust Terminal
loading failed, try refresh UwUThe idea came from an amazing work by Andy Sloane1 where he wrote a compact C code (shaped like a flat donut) that renders a spinning donut in terminal. Multiple people did videos about it and it was a blast.
The thing that particularly interest me is that it should not be hard to create a 3D graphics engine in terminal. With limited resolution, performance should not be a bottleneck for doing thing the easiest way2. I'm pretty confident that I can nail it with whatever I still remember from my collage class on computer graphics.
Initially I was doing it in Python, specifically Numpy for the vector math part. It didn't take too long for me to realize that vanilla Numpy computation is too slow for the framerate I desire, and it quickly get obviously worse when more steps is added to the rendering. So I decided to move to Rust, which I happened to want to pick up recently, and as early as possible.
For this post I will focus on how to build the most basic parts so that we have a decent initial result: a spinning cube like this:
loading failed, try refresh UwUTerminal Rendering
The idea is very simple: our "player" should have a fixed grid of char, whose content will be updated every frame, and we want to refresh the screen with these characters every frame. So here it is:
struct Player {
    w: usize,
    h: usize,
    a: Vec<Vec<char>>,
    dt: f32,
}

impl Player {
    pub fn new(w: usize, h: usize, fr: usize) -> Self {
        let a = vec![vec![' '; w]; h];
        let dt = 1.0 / (fr as f32);
        Player { w, h, a, dt }
    }
}
Note that we also have a dt attribute, which is computed from the framerate, It will become handy later when we involve moving objects.
The first problem (but quite an easy one) is how to display "moving things" on terminal with fixed framerate? The answer is that you need some particular control sequences from ANSI escape codes which can manipulate the cursor on terminal screen. Specifically we need the following two3:
\x1B[Fmoves the cursor up a line.\x1B[Kwill clear the current line and cursor will be in the front.
With these 2 characters, we can "reprint" our screen (given a fixed size we want to display) at each frame and create a moving effect. So the render method should be like this:
const CURSOR_UP: &str = "\x1B[F";
const CLEAR_LINE: &str = "\x1B[K";

// ...
impl Player {
    // ...

    pub fn render(&self) {
        // self.h + 1 if printing stats.
        println!("{}", CURSOR_UP.repeat(self.h));
        for l in &self.a {
            let l_str: String = l.into_iter().collect();
            println!("{}{}", CLEAR_LINE, l_str);
        }
    }
}
Another thing to notice is that in order to get stable framerate (e.g. 24 FPS) we need to track the time taken to render each frame, and take that off from dt to get the actual wait time. That correspond to the load of the graphics engine. When the rendering gets more complex there might not be enough time to complete rendering within one frame, and the framerate will start to drop.
We will use the std::time standard lib to achieve this, and (optionally) print out live performance stats during rendering. The play method also takes in a duration in seconds, and stops the play after that time:
use std::thread;
use std::time::Duration;
use std::time::Instant;

// ...
impl Player {
    // ...

    pub fn update(&mut self) { /* TODO */ }

    pub fn play(&mut self, duration: f32) {
        let mut t = 0.;
        loop {
            let start = Instant::now();
            self.render();
            self.update();
            let compute_t = start.elapsed().as_secs_f32();
            let wait_t: f32 = if self.dt >= compute_t {
                self.dt - compute_t
            } else {
                0.
            };
            /*
            // Print stats
            println!(
                "{}compute_time: {} wait_time: {}",
                CLEAR_LINE, compute_t, wait_t
            );
            */
            t += self.dt;
            if t >= duration { break };
            thread::sleep(Duration::from_secs_f32(wait_t));
        }
    }
}
Note that we have an update function as TODO, which will be be the core part of our graphics engine, because it not only update the objects themselves, but also update all the "pixels" (or "characters") of our screen.
Ray Tracing
Here comes the core part of the project: ray tracing! The basic reasoning behind this is that when we simulate a scene, all the light rays going into our eyes (or a camera) are reversible. Given that, we can trace all the light rays from the eye to objects (and possibly reflected to something else) and compute the color we're supposed to see from that ray.
Since the rendering is in terminal, we only care about the intensity (or luminance) of the object, also for the simpler version we don't do any reflection and only compute the color at the intersection point (will cover that later). So the most important problem is how do we get the intersection of a ray with an object?

Ray Triangle Intersection
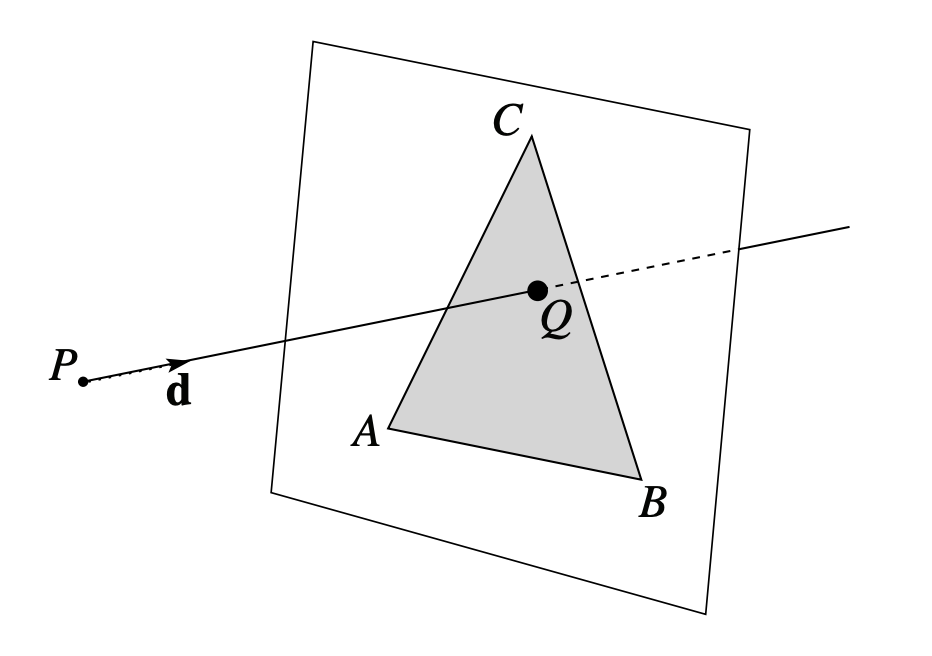
The first thing we need to support is triangle. It's the basic shape to form a cube, and with small enough triangle you can simulate any object. You can find tons of references online (e.g. this nice doc from UW), but the basic solution is like this:
- Light ray represented by origin \(P\) and direction \(\vec{d}\): $$ R(t) = P + t\vec{d} $$
- Plane has many ways to represent, we're given the 3 points of a plane (the triangle) \(A\), \(B\) and \(C\), and we compute the normal vector \(\vec{n}\): $$ \vec{n} = \frac{\overrightarrow{AB}\times\overrightarrow{AC}}{\left|\overrightarrow{AB}\times\overrightarrow{AC}\right|} $$ The plane is then represented by this equation: $$ \vec{n}\cdot X = \vec{n}\cdot A $$
Note that the normal vector is decided by the orientation of the 3 points: it points up when \(A\), \(B\) and \(C\) is in counter-clockwise order (right-hand rule). We use the direction of normal vector to define the "positive side" of the triangle, and reject intersection from the "negative side". That is done by checking if \(\vec{n}\cdot\vec{d} > 0\).
Solving for the intersection by replacing \(X\) in plane equation with \(R(t)\):
We're half way there. As long as the ray is not parallel to the plane, there must be an intersection. But we only care about the intersection when it's within the triangle, so we need to check for that.

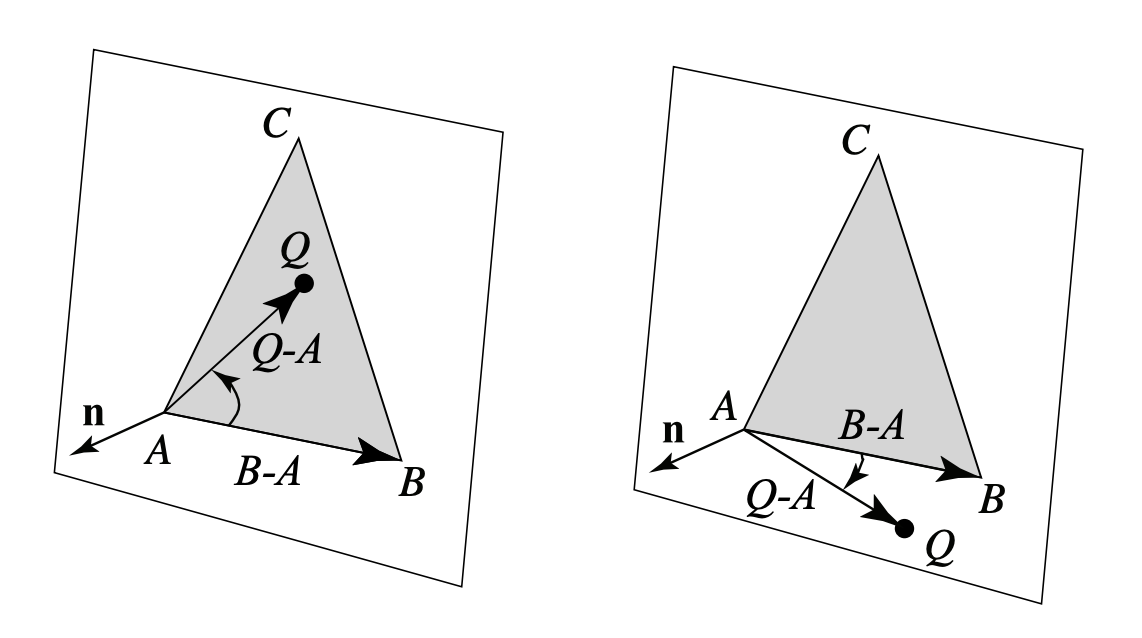
Check if Q is in triangle
If we check that for all 3 edge vectors of the triangle we'll get the answer.
Putting everything together, we come up with a very simple implementation of a triangle type:
use glam::Vec3;

struct Triangle {
    a: Vec3,
    b: Vec3,
    c: Vec3,
    n: Vec3,
}

impl Triangle {
    pub fn new(a: Vec3, b: Vec3, c: Vec3) -> Self {
        let n = (b - a).cross(c - a).normalize();
        Triangle { a, b, c, n }
    }

    pub fn intersect(&self, p: Vec3, d: Vec3) -> Option<Vec3> {
        let n_dot_d = self.n.dot(d);
        if n_dot_d >= 0. { // Check for positive side
            return None;
        }
        // Solve for Q
        let t = self.n.dot(self.a - p) / n_dot_d;
        let q = p + t * d;
        // Check if Q is in triangle
        if (self.b - self.a).cross(q - self.a).dot(self.n) < 0.
            || (self.c - self.b).cross(q - self.b).dot(self.n) < 0.
            || (self.a - self.c).cross(q - self.c).dot(self.n) < 0.
        {
            return None;
        }
        Some(q)
    }
}
As we're getting into the computation, we need help from some library specialized for 3D geometry. We'll use glam4, a crate that provides 3D vector types and related operations with decent performance optimizations.
This is already pretty long and you're bored, so I'll stop here and continue in following posts, where I'll talk about the rest of the pieces to achieve a spinning cube: orthographic camera, directional lighting and rotation. All the code can be found here and see you next time!
He also did a lot of interesting things with 3D rendering and embedded environments, please check him out.↩
Which comes as a surprise that performance is still important in some sense in later part of this project.↩
You can find them in the CSI (Control Sequence Introducer) sequences section in the wiki page↩
There is a variety of other libraries e.g. ultraviolet and nalgebra. The reason for choosing glam is that it seems to be optimized for 3D graphics and is actively maintained.↩