cosmo: 3D Graphics Engine in Terminal (Cont.)
2024-09-14 21:49:44 tech Computer Graphics Ray Tracing Rust Terminal

David Head Rendered in 24FPS
This is a continuation of the previous post, where we talked about my side project cosmo and partly about details to implement a basic 3D graphics engine in terminal. In this post we're going to cover the rest parts of implementing a basic PoC (Spinning Cube™).
Camera
To see, is to have many light rays collected onto your retina. Here we're doing the opposite (as discussed in the Ray Tracing section last time), determine a set of light rays going out, based on the type of camera we're using.
- Orthogonal: all light rays are parallel to each other, so that visual scale is not related to how far the objects are from the camera. This is not natural to our eyes, but quite unique taste in video games (e.g. Monument Valley, Tunic) and cinematography (e.g. movies by Wes Anderson)
- Perspective: All light rays are shooting from a single point. This is closest to our natural experience and result of most medias.
- Other types like fisheye, 360-degrees etc.
For our basic PoC, we'll implement the orthogonal camera as it's probably the easiest one. To determine such a camera in 3D space, we need a grid of points (pixels on the "film") and a direction. The grid of points can then be further abstracted into the center point of the "film" and the size (width, height) of it. For further simplicity, we fix the camera's direction to be along the negative direction of x-axis1. The implementation is something like this:
pub struct Camera {
    pub rays: Vec<Vec<Ray>>,
}

impl Camera {
    pub fn new(w: usize, h: usize, scale: f32) -> Self {
        let mut rays: Vec<Vec<Ray>> = vec![];
        for i in 0..h {
            rays.push(vec![]);
            let z = ((h as f32) / 2. - (i as f32)) * scale * 2.;
            for j in 0..w {
                let y = (-(w as f32) / 2. + (j as f32)) * scale;
                rays[i].push(Ray {
                    p: Vec3::new(0., y, z),
                    d: Vec3::new(-1., 0., 0.),
                });
            }
        }
        Camera { rays }
    }
}
A few points to notice:
- We're using a custom struct
Ray, which is just an encapsulation of a point and a direction, both represented byglam::Vec3. - We also added a
scaleparameter, because the width and height here are integer values representing the discrete number of pixels, we also need a way to scale ("zoom") without changing the resolution. - There's an extra
* 2.for thezcoordinate, this is to compensate for the character width-height-ratio in the terminal. For what I'm using (VS code) it's 2.
Now is a good time to start building our "cube" object with some triangles (12 triangles to be specific). To achieve the orientation like this a good amount of calculation is needed, so here's my version of it:
let A = Vec3::new(0., 0., 8.660254);
let B = Vec3::new(0., 0., -8.660254);
let C = Vec3::new(8.164965, 0., 2.886751);
let D = Vec3::new(-4.082483, 7.071067, 2.886751);
let E = Vec3::new(-4.082483, -7.071067, 2.886751);
let F = Vec3::new(4.082483, 7.071067, -2.886751);
let G = Vec3::new(-8.164965, 0., -2.886751);
let H = Vec3::new(4.082483, -7.071067, -2.886751);
let triangles: Vec<Triangle> = vec![
    Triangle::new(A, C, D),
    Triangle::new(C, F, D),
    Triangle::new(A, D, E),
    Triangle::new(D, G, E),
    Triangle::new(A, E, C),
    Triangle::new(E, H, C),
    Triangle::new(D, F, G),
    Triangle::new(F, B, G),
    Triangle::new(C, H, F),
    Triangle::new(H, B, F),
    Triangle::new(E, G, H),
    Triangle::new(G, B, H),
];
With that, we can make the Player object take in triangles and a Camera object, and update the screen based on what the camera can see:
// ...
impl Player {
    // Add triangles and camera
    pub fn new(w: usize, h: usize, fr: usize,
            triangles: Vec<Triangle>, camera: Camera) -> Self {
        let a = vec![vec![' '; w]; h];
        let dt = 1.0 / (fr as f32);
        Player { w, h, a, dt, triangles, camera}
    }

    pub fn update(&mut self) {
        for i in 0..self.h {
            for j in 0..self.w {
                self.a[i][j] = ' ';
                for t in &self.triangles {
                     match t.intersect(&self.camera.rays[i][j]) {
                        Some(_) => {
                            self.a[i][j] = '.';
                            break;
                        },
                        None => {},
                    }
                }
            }
        }
    }

    // other functions ...
}
The logic is pretty simple: for each pixel assume blank at beginning, then go over all the triangles and put a dot when an intersection happens, and break early. This works in our cube case because we only have one object in the scene, so one ray cannot intersect 2 triangles both on the positive side2.
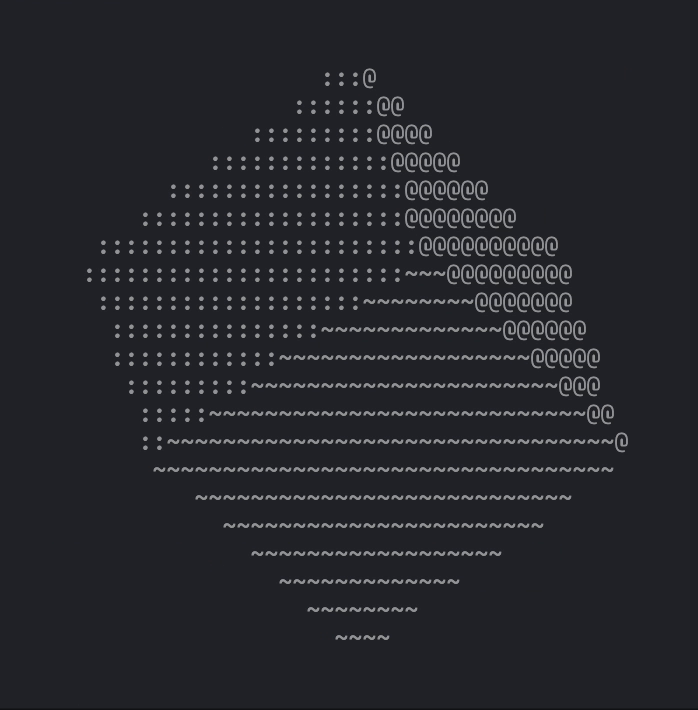
With what we already have and some additional code in main.rs to connect everything together, we can do cargo run and get a still frame of this:
Initial Result
This is not that exciting and a bit stupid, but this is clearly correct and does look like the shadow of a standing cube. You can get it from this brach of the code, and feel free to play with the camera parameters to check the effects.
Lighting
To improve our result, we need to add lighting to the scene. There're a few common types of lighting used in 3D graphics:
- Ambient light: inherent light effect of objects when there isn't external light source. The dot we used in the previous code can be considered as some sort of ambient light.
- Directional light: light of same intensity shining in parallel along one direction, like sun light.
- Point light: light shining from a point in 3D space, intensity is usually modeled the inverse-square law.
For simplicity we will implement directional light for our PoC, but point light is also simple enough and is left as a homework :)
pub struct Light {
    pub d: Vec3,
    pub intensity: f32,
}

impl Light {
    pub fn get_luminance(&self, n: Vec3) -> char {
        let mut lum = 0.;
        if n.dot(self.d) < 0. {
            lum = self.intensity * (-n.dot(self.d));
        }
        let index: Vec<char> = vec![
            '.', ',', '-', '~', ':', ';', '=',
            '!', '*', '#', '$', '@', 'M',
        ];
        let i = (lum.min(0.99) * (index.len() as f32)).floor();
        index[i as usize]
    }
}
Only one function get_luminance is needed for the Light object, where we use the normal vector of the intersection point to compute the luminance of that pixel: only when the normal is "facing" the light direction will it have a positive luminance3.
With this, we can pass a Light object into player, and properly use it when updating each pixel with an intersection to any triangle:
// Replacing self.a[i][j] = '.';
self.a[i][j] = self.light.get_luminance(t.n);
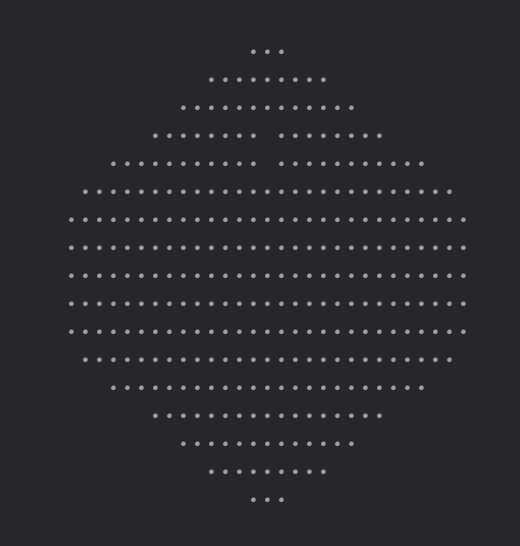
With this branch of the code, we can get a render that makes more sense:
Hey, it looks pretty cubical if you take the glasses off!
Rotation
Now that we have a correctly rendered cube, the last step is to make it move. Generally a rotation matrix is used based on the axis and radian of the desired rotation, but for simplicity we will just use the simple matrix which rotates around \(z\) axis:
For any point \(P = (x, y, z)^T\), the new point \(P'\) after rotation can be found by simply doing matrix multiplication:
With the theory, we add a util function rotate_z which takes in the radian rotated per second, the time taken for each frame (dt) and a Vec3 point to be processed in-place.
pub fn rotate_z(rad: f32, dt: f32, p: &mut Vec3) {
    let a = rad * dt;
    *p = Vec3::new(
        p.x * a.cos() - p.y * a.sin(),
        p.x * a.sin() + p.y * a.cos(),
        p.z
    );
}
The rotation function (especially a generalized one) would be quite useful, for example supporting a camera of any angle (or even moving camera). For now we just need to use it in the Triangle struct as an update process, and call it from the update process of Player:
// In triangle.rs

// Don't forget to add rad: f32 as an attribute
// and properly initialize it.
impl Triangle {
    // ...

    pub fn update(&mut self, dt: f32) {
        rotate_z(self.rad, dt, &mut self.a);
        rotate_z(self.rad, dt, &mut self.b);
        rotate_z(self.rad, dt, &mut self.c);
        // Re-compute normal vector
        self.n = (self.b - self.a).cross(self.c - self.a).normalize();
    }
}

// In player.rs
impl Player {
    // ...

    pub fn update(&mut self) {
        for t in &mut self.triangles {
            t.update(self.dt);
        }

        // Other logics in update...
    }
}
With this version, we finally achieved our goal: a spinning cube. Feel free to play around the camera/light parameter, implement other types of camera/lighting/objects. It's really fun and rewarding.
loading failed, try refresh UwUAfterword
Although this is quite different from the current implementation of cosmo, the core idea is almost the same, and you can build on top of this in anyway you see fit.
In the next post I will talk more about my current implementation, including some of the "fancy stuffs" I was trying to pull off, like how to create shadow? How does one object block another? What to do when there're too many objects in the scene and we hit performance issue?
Hope you enjoyed and happy hacking :)
This is quite an over simplification. In formal computer vision study we should use something like a camera matrix, which takes in a point in space with homogeneous coordinates, and directly computes the corresponding position on the film of the camera.↩
It gets more complicated when you have multiple objects and each object consists of so many triangles. Tune in for next post :)↩
The luminance index is an adaptation of Andy's version in the original "donut" code:
.,-~:;=!*#$@↩